
Docker — Time to Isolate Up The Development Environment to Containers!
The story of how did we migrate to Docker as a development environment. Let’s get to know more now!
Docker — Time to Isolate The Development Environment to Containers!
Background
I’m a Full Stack Developer at Kontinentalist, where I develop both front- and back-end sides of Konti as well as its server and DevOps. At Kontinentalist, our stories are accompanied by maps and data visualisations (check out our latest story on weird beasts in Asia here). Currently, our main product are our stories, though we are working towards our next main product called the Map Platform, which will be a one-stop geospatial database for information about Asia.
Our everyday development workflow is like this: we develop the back- and front-end separately, which means that they’re in different repositories. Subsequently, we deploy everything from the repo to the cloud server that has been set up for the production environment.
The Problem
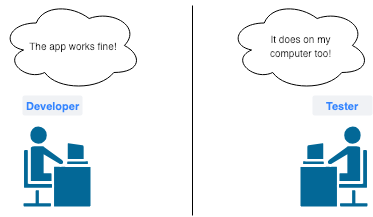
We didn’t virtualise or containerise our development environment back then. Instead, we developed the apps on the local machines, then deployed them right away to the cloud server. Bet you can guess what happened afterwards. The “it works on my local but it doesn’t on my production machine” kind of bug happened, which was so frustrating as we needed to find out what’s missing, what’s the difference, etc, between our local and production machines.
We figured that to solve this problem, we should isolate the apps within an environment. Rather than send the main app source to the cloud server for deployment, we deployed the whole environment instead. This approach could’ve been implemented by having Virtual Machines, such as Vagrant, as the development environment. But a Virtual Machine is not ideal when we want a speedy development process*; it takes up GBs of memory space and tons of time just to boot up one app development.
*We take speed, effectiveness and efficiency of development process seriously at Kontinentalist 😌.
The Solution
Docker was the solution. It allowed us to resolve our issue by allowing us to containerise our development environment, and for reasons that’ll be elaborated below, Docker works better than Virtual Machines (and its free!). By the way we’re not paid by Docker to say any of this!
What is Docker ?
Docker is a computer program that performs operating-system-level virtualization, also known as “containerization”. It was first released in 2013 and is developed by Docker, Inc. Docker is used to run software packages called “containers”. — Wikipedia
As a virtualisation, Docker is still considered a Virtual Machine but it’s more powerful than that. I’ve attached a quick summary of the differences between Docker and Virtual Machines.

Docker runs on top of operating system level and isolates the applications to containers. All bins/libs that are required for the apps from the operating system are available within the containers without having a whole operating system installed. This means that each environment doesn’t require the installation of an operating system, which makes things so efficient!
How it works
To start off, you need to install the Docker Engine on your machine. This is the main application that builds and executes containers using Docker Components.
Speaking from a programming perspective, think of a container like an instance / object from a class, and the class itself in Docker is called image. It’s as simple as that 😉.
Let me elaborate a little about the Docker Components before we move on to Docker’s processes:
- Docker Client — is a CLI service that sends commands through REST API to Docker Daemon.
- Docker Daemon — is the server of Docker; how it communicates is through REST API from the client.
- A Docker Image — is a master file used for building Docker Containers.
- A Docker Container — is a live running instance of a Docker Image.
- Docker Registry — is a service used for hosting and distributing Docker Images. The default Docker Registry is Docker Hub.
Now to the juicy part — let’s breakdown what happens under the hood!
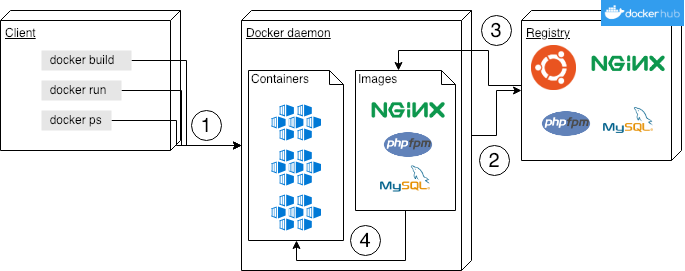
- A client sends out commands using CLI through REST API protocol to docker daemon. When the command is about building images, i.e. docker build…
- …the daemon will send a request to get a particular image from the registry. By default, the registry is from Docker hub.
- Then the docker daemon will download the image from the repository of the registry of the image that it has requested for.
- Once the image is downloaded on your machine, then it’ll start building the container. Once all the containers are up, you are good to go! Hooray, you will now magically have all the services/servers/anything you want installed on your machine!
Pretty convenient, huh?
Dockerfile
When you select docker build, the docker daemon will search for a file called Dockerfile. A Dockerfile is a file that creates a container that consists of instructions of how you’d like the container to be, the services you’d want to install, what provision scripts you’d want to set up etc, then the remaining process will be as explained in Fig 4. Once the image that you’ve defined from the Dockerfile has been successfully built, you can run the container by typing out docker run command (and specifying the image you want to create the container from). Next, it’ll search for the image that you’ve specified, and once the container is up, you are good to go.
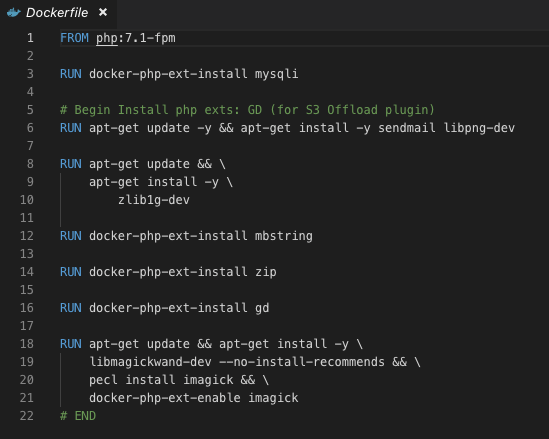
The figure above is an example of Dockerfile. It basically tells docker daemon to install php with version 7.1-fpm (line 1), and install the php extensions that have been defined in the Dockerfile subsequently (line 3 onwards). You can check out the Dockerfile documentation’s list of commands and the respective services you’d like from Docker Hub, i.e. php in this case. The documentations are neat and easy to understand.
Using Dockerfiles to install services within the container is simple if you don’t have many containers to use, but a new problem comes up when you do.
Docker Compose
That’s where Docker Compose comes in!
Docker compose helps to simplify the process of running the containers. Instead of running the Dockerfiles sequentially from the CLI, you just need to send out a single command to run a single docker compose file, docker-compose run, then all the images and containers that you’ve set up from the docker-compose.yml will be executed.
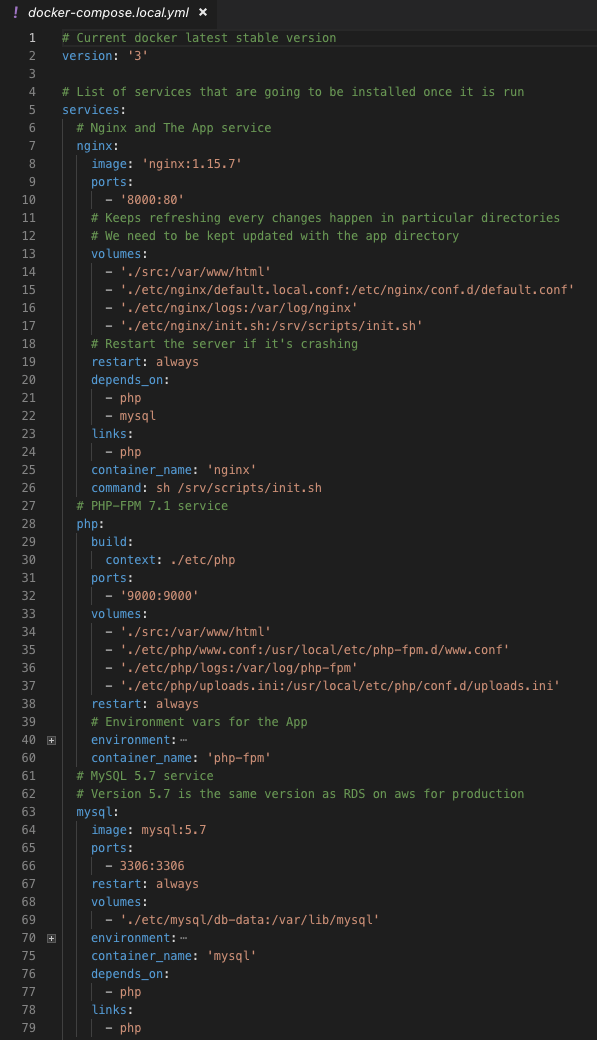
There are three services defined in the docker-compose file above: nginx, php, and mysql. It’s really convenient when you have multiple containers to run because by using a single command, these services will be installed and accessible on your machine from the ports that you’ve defined.
How did we use Docker?
We’ve talked about how Docker works, now let’s talk about how we use it at Kontinentalist.
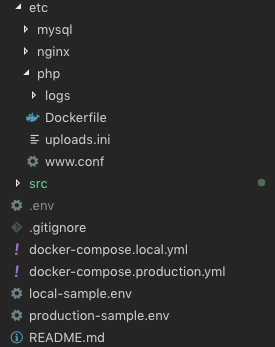
We set up the project structure as above. Here’s the breakdown:
- etc folder consists of required files and folders for each service (Dockerfile, config files, and so on).
- src folder is the main project source.
- Last but not least, .env and docker-compose files are in the project root directory.
We didn’t mix everything in the root directory for three reasons. First, to ease up the accessibility of each component. Second, we didn’t want to bloat up the container that is mounted by the main project file with nonsense (i.e. docker files and etc files). Relatedly, we think that this structure is neater 😙.
Also yes we do have two docker-compose files, docker-compose.local.yml and docker-compose.production.yml. It’s not necessary. It really depends on your preference for treating your production server. For us, even though we have migrated from the “conventional” method to Docker, we’re still using the database from the previous server. The differences between the two docker files are the database. We run the database from the container on local, and ports that we expose for each service.
To run the app, we just run a single command:
docker-compose -f docker-compose.[local/production].yml run -d
And to stop:
docker-compose -f docker-compose.[local/production].yml down -v
Conclusion
Let’s sum up why we migrated to Docker!
- Portability — It overcomes the main problem of “it works on my local but it doesn’t on the production machine” bug. We no longer have to worry about which machines and configurations to use for our development and production since everything has been set up and run exactly as defined in the Dockerfile.
- Speed — It increases the development speed as it doesn’t need to boot up and install an operating system just for one environment. Also, the configuration time will be shorter as it doesn’t need to set up a new operating system.
- Performance — Hardware is emulated by Virtual Machines, while Docker runs the applications in isolated containers directly on host operating system (or the server that hosts them), which means that applications that run on Docker containers have less overhead and will also perform faster.
- Efficient — Since it doesn’t require the whole operating system which takes up GBs of spaces, the project size will be smaller.
That’s about it! Simple and neat, right? 😊